【手撸RPC框架】SpringBoot+Netty4实现RPC框架
线程模型
简单了解React线程模型,参考文章【五分钟快速理解 Reactor 模型】
线程模型1:传统阻塞 I/O 服务模型
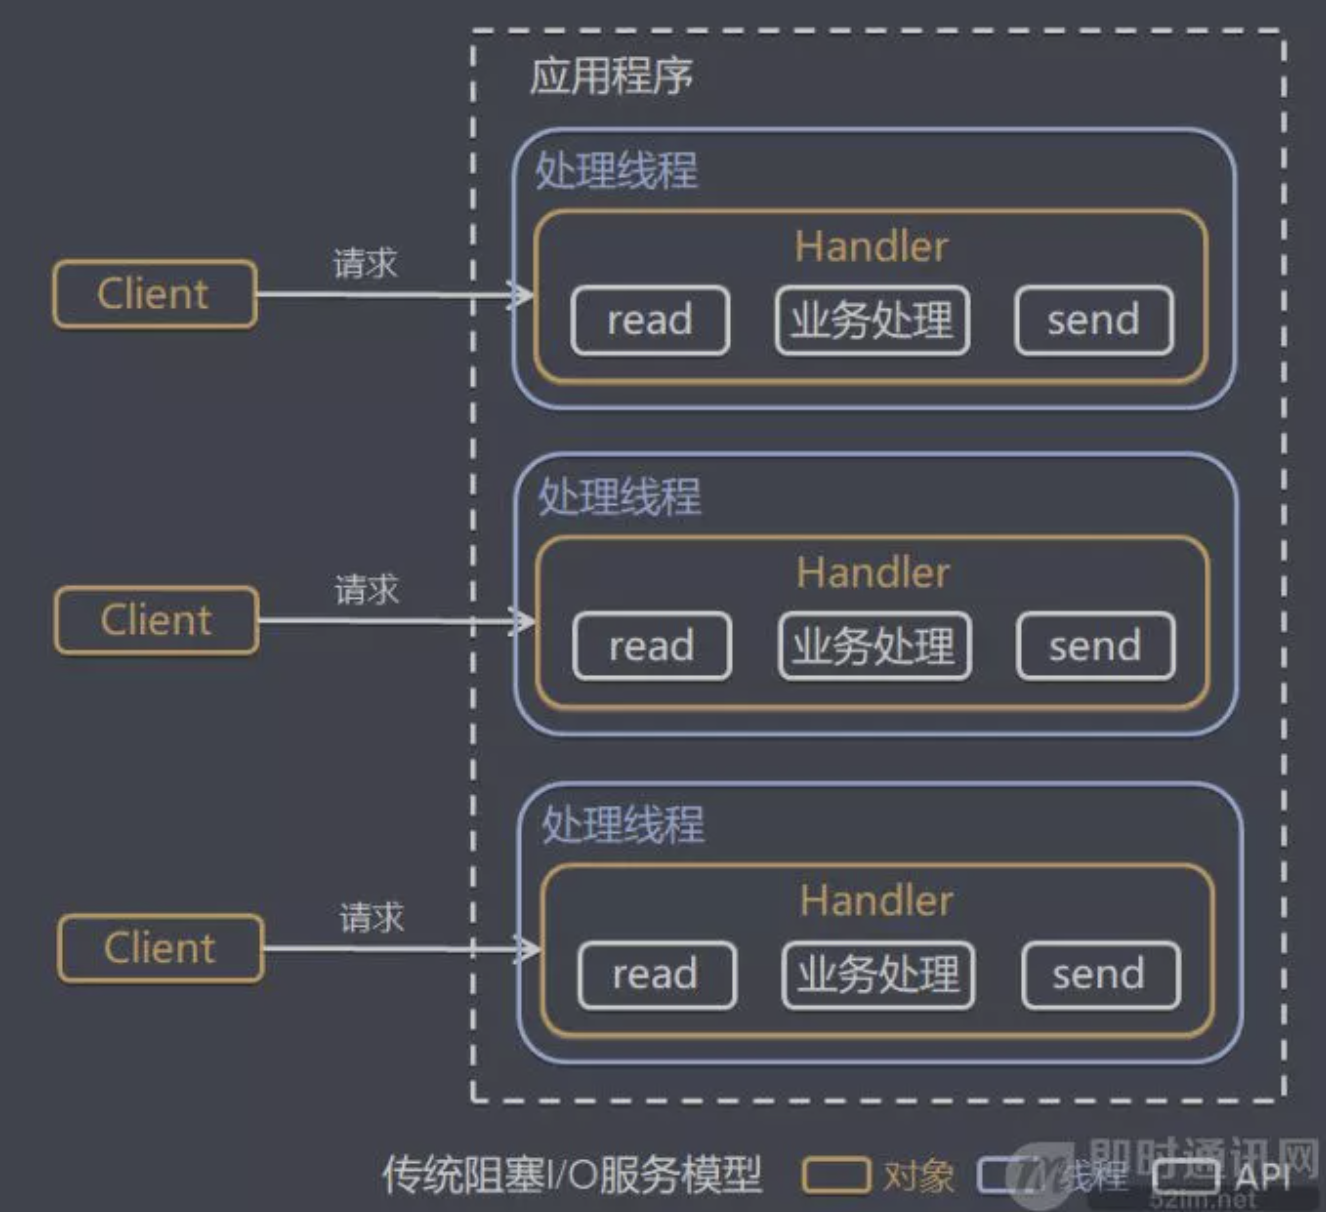
模型特点:
- 采用阻塞
IO模式获取输入的数据 - 每个链接都需要独立的线程完成数据的输入,业务处理、数据返回。
问题分析:
- 当并发数很大,就会创建大量的线程,占用很大系统资源
- 连接创建后,如果当前线程暂时没有数据可读,该线程会阻塞在
read操作,造成线程资源浪费。
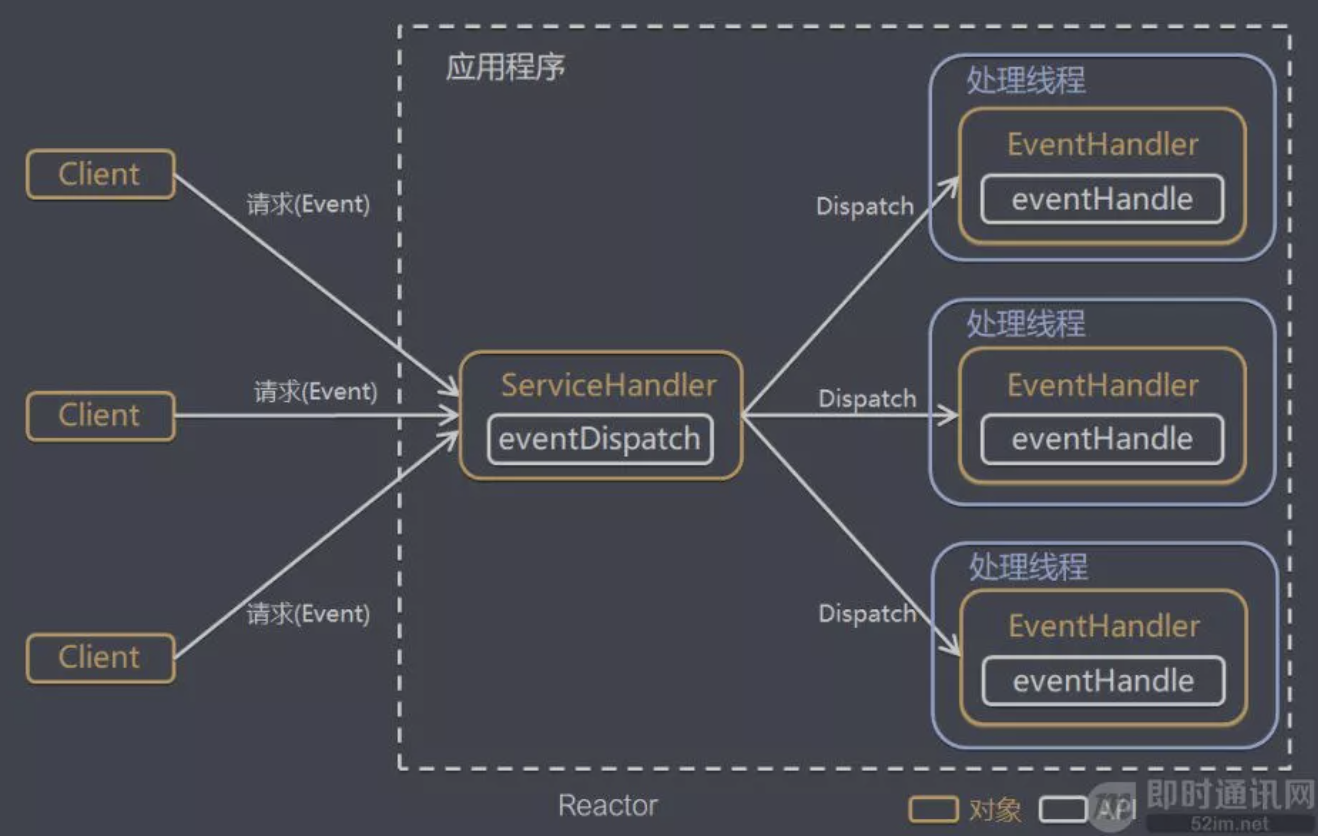
线程模型2:Reactor 模式
针对传统阻塞I/O服务模型的2个缺点,解决方案如下:
- 基于
I/O复用模型:多个连接共用一个阻塞对象,应用程序只需要在一个阻塞对象等待,无需阻塞等待所有连接。当某个连接有新的数据可以处理时,操作系统通知应用程序,线程从阻塞状态返回,开始进行业务处理。Reactor对应的叫法: 1. 反应器模式 2. 分发者模式(Dispatcher) 3. 通知者模式(notifier) - 基于线程池复用线程资源:不必再为每个连接创建线程,将连接完成后的业务处理任务分配给线程进行处理,一个线程可以处理多个连接的业务。
单 Reactor 单线程
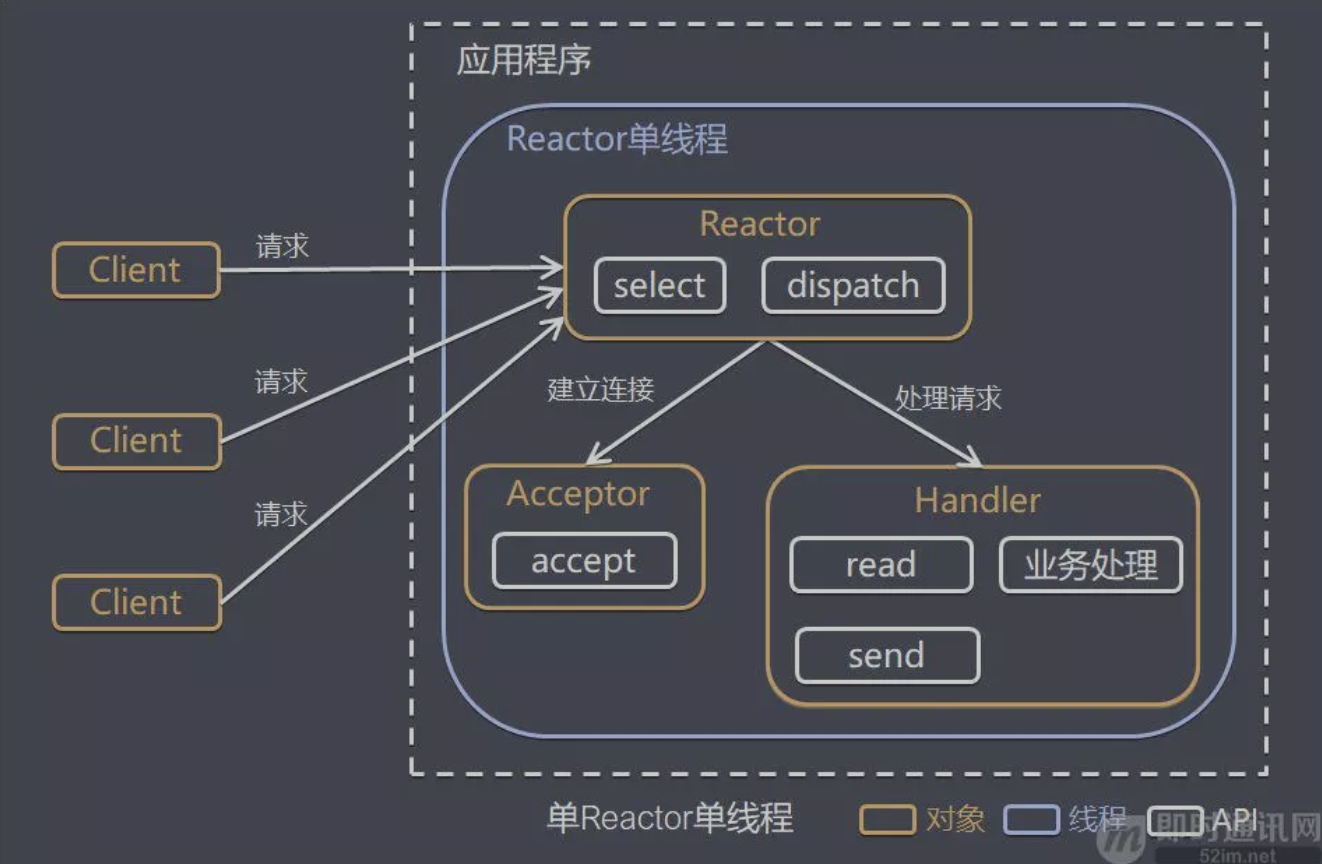
模型分析
- 优点:模型简单,没有多线程、进程通信、竞争的问题,全部都在一个线程中完成
- 缺点:性能问题,只有一个线程,无法完全发挥多核 CPU 的性能。Handler 在处理某个连接上的业务时,整个进程无法处理其他连接事件,很容易导致性能瓶颈
- 缺点:可靠性问题,线程意外终止,或者进入死循环,会导致整个系统通信模块不可用,不能接收和处理外部消息,造成节点故障
- 使用场景:客户端的数量有限,业务处理非常快速,比如 Redis在业务处理的时间复杂度 O(1) 的情况
单 Reactor 多线程
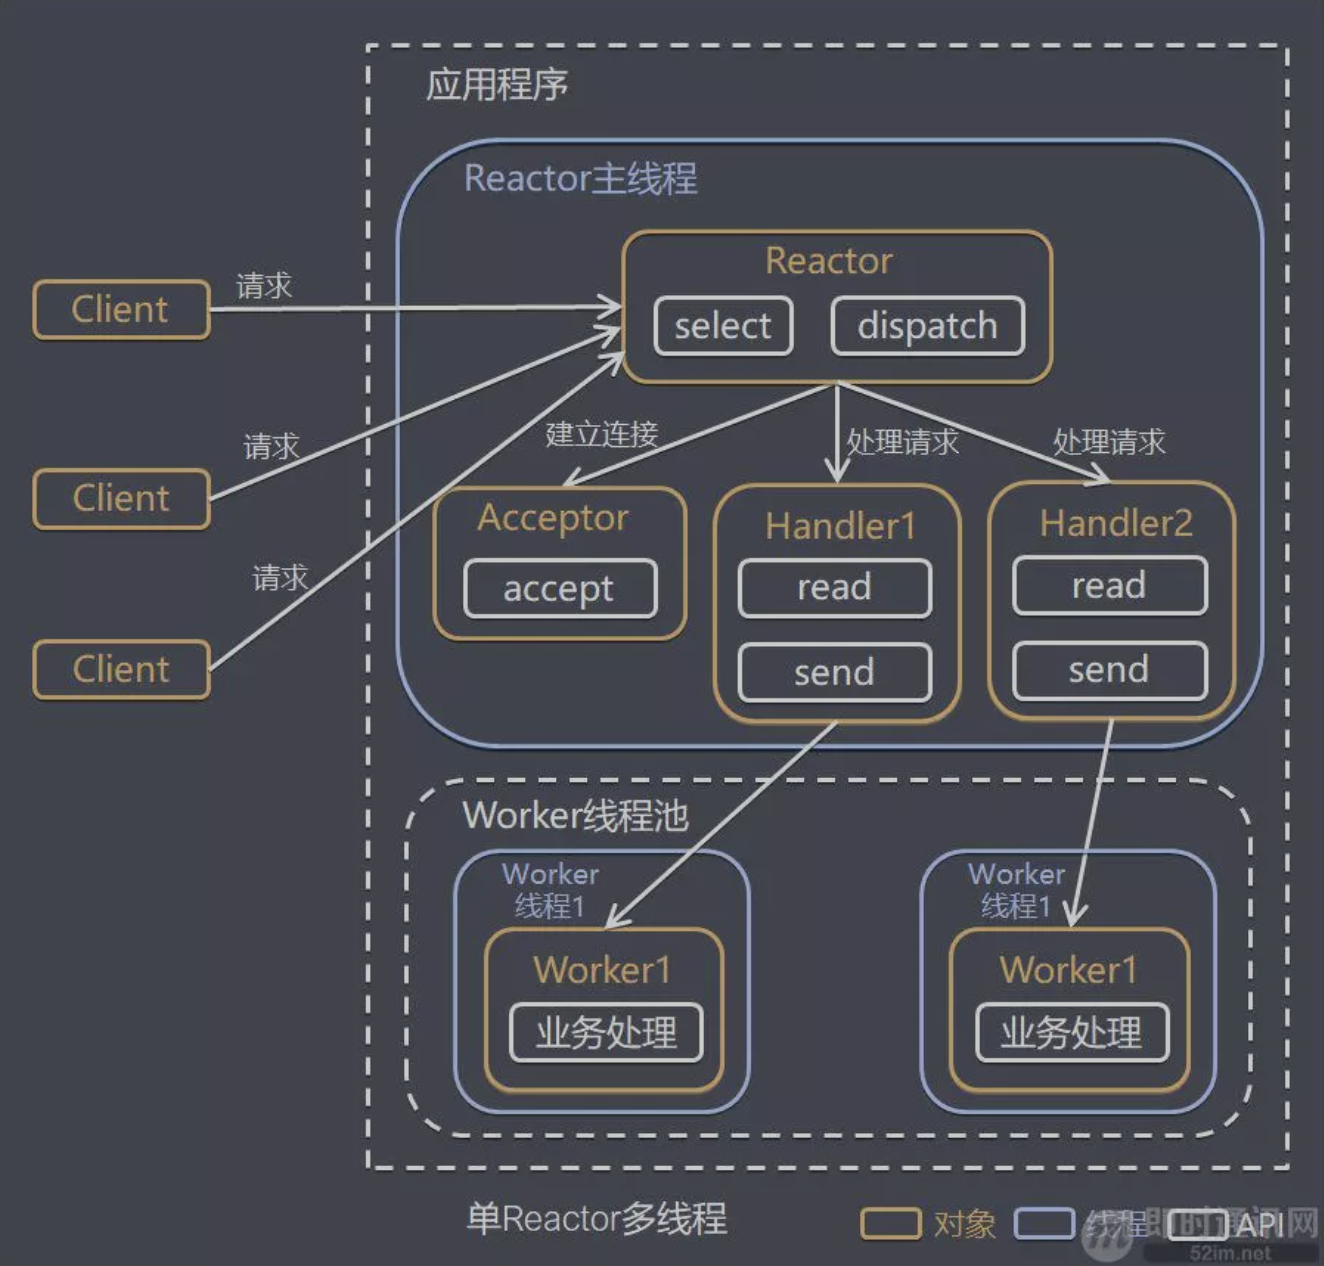
模型分析
- 优点:可以充分的利用多核
cpu的处理能力 - 缺点:多线程数据共享和访问比较复杂,
reactor处理所有的事件的监听和响应,在单线程运行, 在高并发场景容易出现性能瓶颈.
主从 Reactor 多线程
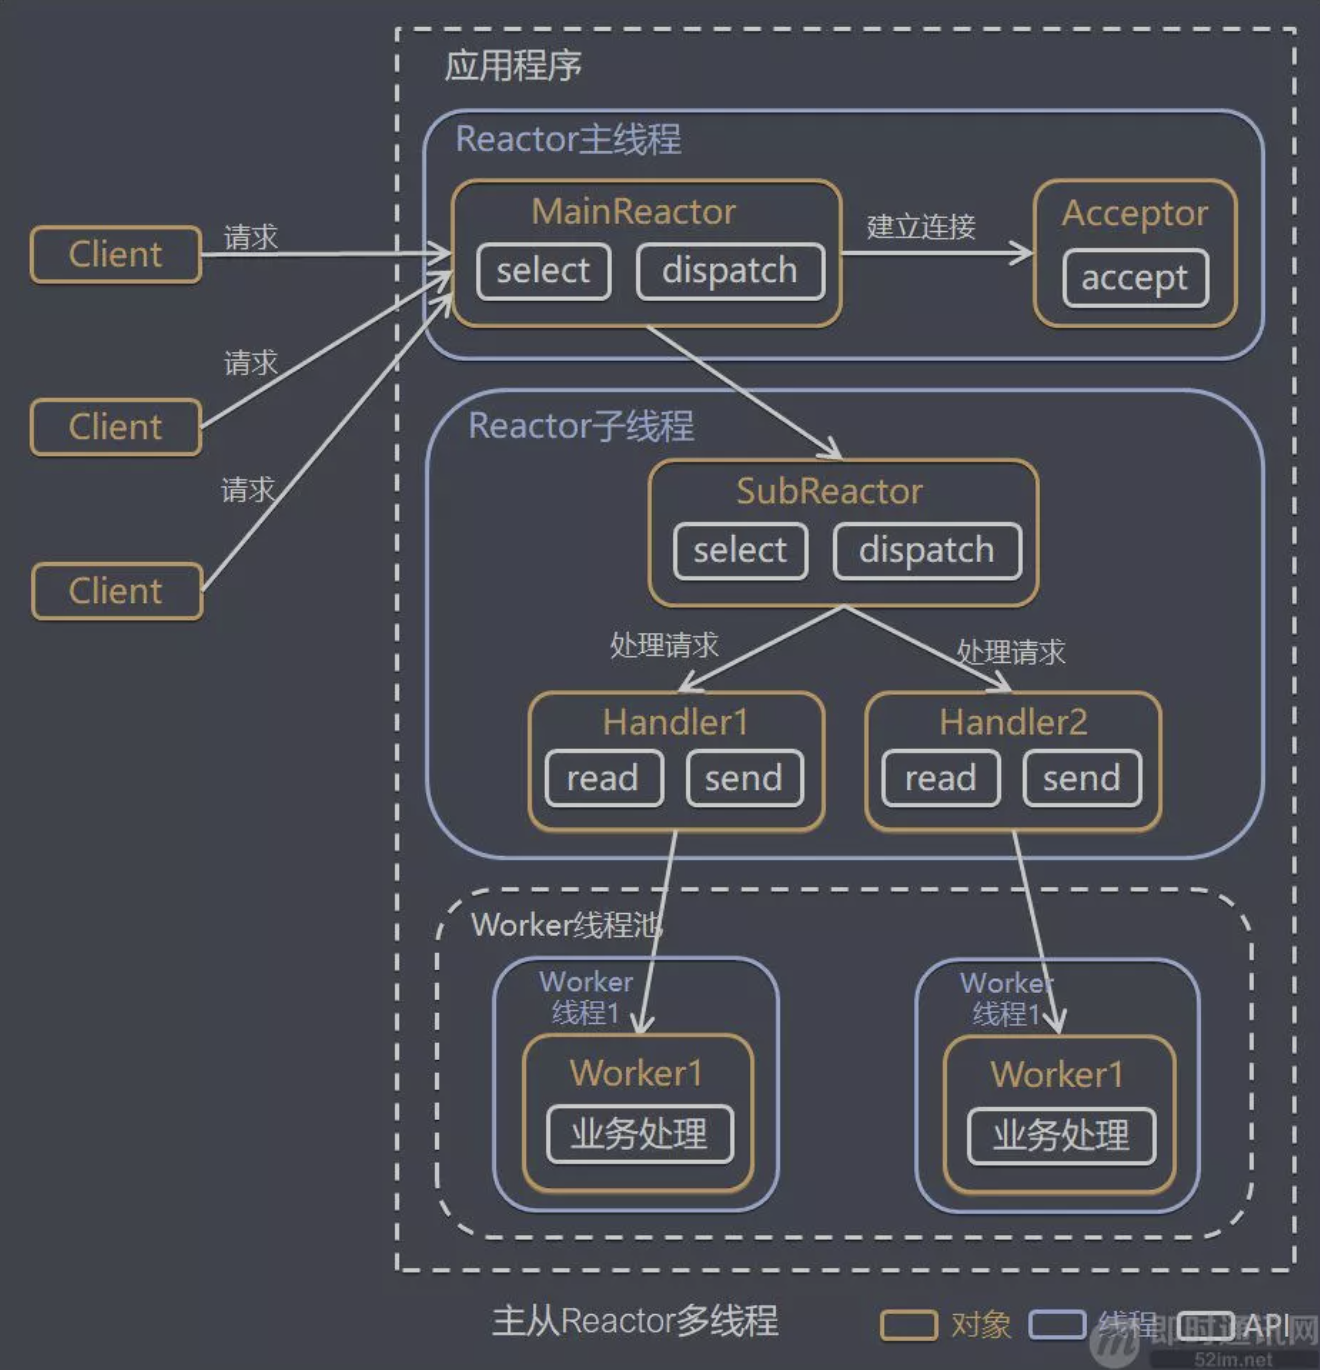
模型分析
- 优点:父线程与子线程的数据交互简单职责明确,父线程只需要接收新连接,子线程完成后续的业务处理。
- 优点:父线程与子线程的数据交互简单,Reactor 主线程只需要把新连接传给子线程,子线程无需返回数据
- 缺点:编程复杂度较高
- 结合实例:这种模型在许多项目中广泛使用,包括 Nginx 主从 Reactor 多进程模型,Memcached 主从多线程,Netty 主从多线程模型的支持
先实现简单的Netty通信
服务端示例
public static void main(String[] args) {
    //创建连接线程组,线程数为1。只负责处理连接请求
    NioEventLoopGroup boss = new NioEventLoopGroup(1);
    //创建工作线程组,线程数默认为cpu核数*2。处理与客户端的业务处理
    NioEventLoopGroup worker = new NioEventLoopGroup();
    //创建Server端的启动对象
    ServerBootstrap serverBootstrap = new ServerBootstrap();
    //配置线程组
    serverBootstrap.group(boss, worker)
        //使用 NioServerSocketChannel 作为服务器的通道实现
        .channel(NioServerSocketChannel.class)
        //给worker线程组初始化处理器
        .childHandler(new ChannelInitializer<SocketChannel>() {
            @Override
            protected void initChannel(SocketChannel socketChannel) throws Exception {
                socketChannel.pipeline()
                    //添加字符串的编解码器
                    .addLast(new StringDecoder())
                    .addLast(new StringEncoder())
                    //添加对象的编解码器,ClassResolvers.weakCachingConcurrentResolver设置弱引用WeakReferenceMap缓存类加载器,防止内存溢出
                    .addLast(new ObjectDecoder(ClassResolvers.weakCachingConcurrentResolver(this.getClass().getClassLoader())))
                    .addLast(new ObjectEncoder())
                    //添加自定义的业务处理器
                    .addLast(new SimpleChannelInboundHandler<Object>() {
                        @Override
                        public void channelActive(ChannelHandlerContext ctx) throws Exception {
                            log.info("客户端连接啦。。。客户端地址:{}", ctx.channel().remoteAddress());
                        }
                        @Override
                        protected void channelRead0(ChannelHandlerContext channelHandlerContext, Object o) throws Exception {
                            log.info("服务端接收到的数据:{}", o.toString());
                            //价值1个亿的AI代码
                            String str = o.toString();
                            str = str.replace("吗", "");
                            str = str.replace("?", "!");
                            str = str.replace("? ", "! ");
                            channelHandlerContext.writeAndFlush(str);
                        }
                    });
            }
        });
    //启动并且监听
    ChannelFuture channelFuture = serverBootstrap.bind(8888).syncUninterruptibly();
    //监听关闭通道
    channelFuture.channel().closeFuture();
}
客户端示例
public static void main(String[] args) {
    //设置客户端工作线程
    NioEventLoopGroup worker = new NioEventLoopGroup();
    //创建客户端启动对象
    Bootstrap bootstrap = new Bootstrap();
    bootstrap.group(worker)
        //通道连接者
        .channel(NioSocketChannel.class)
        //给worker线程组初始化处理器
        .handler(new ChannelInitializer<SocketChannel>() {
            @Override
            protected void initChannel(SocketChannel socketChannel) throws Exception {
                socketChannel.pipeline()
                    //添加字符串的编解码器
                    .addLast(new StringDecoder())
                    .addLast(new StringEncoder())
                    //添加对象的编解码器,ClassResolvers.weakCachingConcurrentResolver设置弱引用WeakReferenceMap缓存类加载器,防止内存溢出
                    .addLast(new ObjectDecoder(ClassResolvers.weakCachingConcurrentResolver(this.getClass().getClassLoader())))
                    .addLast(new ObjectEncoder())
                    //添加自定义的业务处理器
                    .addLast(new SimpleChannelInboundHandler<Object>() {

                        @Override
                        public void channelActive(ChannelHandlerContext ctx) throws Exception {
                            ctx.writeAndFlush("哈哈哈");
                        }

                        @Override
                        protected void channelRead0(ChannelHandlerContext channelHandlerContext, Object o) throws Exception {
                            log.info("客户端接收到的数据:{}", o.toString());
                        }
                    });
            }
        });

    ChannelFuture channelFuture = bootstrap.connect("127.0.0.1", 8888).syncUninterruptibly();
    //客户端需要输入信息,创建一个扫描器
    Scanner scanner = new Scanner(System.in);
    while (scanner.hasNextLine()) {
        String msg = scanner.nextLine();
        //通过channel发送到服务器端
        channel.writeAndFlush(msg + "\r\n");
    }
    channelFuture.channel().closeFuture();
}
快启动试试看把,不过需要注意的是,得先启动服务端哦~
SpringBoot + Netty4实现rpc框架
好了,接下来就让我们进入正题,让我们利用我们所学的知识去实现自己一个简单的rpc框架吧
简单说下RPC(Remote Procedure Call)远程过程调用,简单的理解是一个节点请求另一个节点提供的服务。让两个服务之间调用就像调用本地方法一样。
RPC时序图:
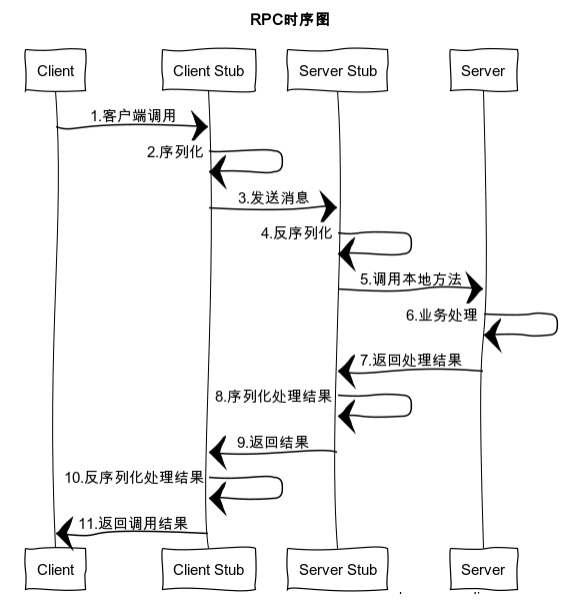
RPC流程:
- 【客户端】发起调用
- 【客户端】数据编码
- 【客户端】发送编码后的数据到服务端
- 【服务端】接收客户端发送的数据
- 【服务端】对数据进行解码
- 【服务端】处理消息业务并返回结果值
- 【服务端】对结果值编码
- 【服务端】将编码后的结果值回传给客户端
- 【客户端】接收结果值
- 【客户端】解码结果值
- 【客户端】处理返回数据业务
引入依赖
<dependencies>
    <!-- SpringBoot依赖 -->
    <dependency>
        <groupId>org.springframework.boot</groupId>
        <artifactId>spring-boot-starter</artifactId>
    </dependency>
    <!-- Spring容器上下文 -->
    <dependency>
        <groupId>org.springframework</groupId>
        <artifactId>spring-context</artifactId>
    </dependency>
    <!-- Spring配置 -->
    <dependency>
        <groupId>org.springframework.boot</groupId>
        <artifactId>spring-boot-configuration-processor</artifactId>
        <optional>true</optional>
    </dependency>
    <dependency>
        <groupId>org.projectlombok</groupId>
        <artifactId>lombok</artifactId>
        <optional>true</optional>
    </dependency>
    <!-- Netty4 -->
    <dependency>
        <groupId>io.netty</groupId>
        <artifactId>netty-all</artifactId>
        <version>4.1.58.Final</version>
    </dependency>
    <!-- 工具 -->
    <dependency>
        <groupId>cn.hutool</groupId>
        <artifactId>hutool-all</artifactId>
        <version>5.5.8</version>
    </dependency>
</dependencies>
编写服务端
自定义消息协议:
/**
 * @author zc
 * @date 2021/3/1 17:43
 */
@Data
@Builder
@NoArgsConstructor
@AllArgsConstructor
public class RpcMessage implements Serializable {
    private static final long serialVersionUID = 430507739718447406L;
    /**
     * interface接口名
     */
    private String name;
    /**
     * 方法名
     */
    private String methodName;
    /**
     * 参数类型
     */
    private Class<?>[] parTypes;
    /**
     * 参数
     */
    private Object[] pars;
    /**
     * 结果值
     */
    private Object result;
}
自定义Rpc注解:
/**
 * @author zc
 * @date 2021/3/2 15:36
 */
@Target(value = {ElementType.TYPE, ElementType.FIELD})
@Retention(RetentionPolicy.RUNTIME)
@Documented
@Inherited
public @interface RpcServer {
}定义ServerHandle业务处理器:
/**
 * Netty Server端Handle处理类,消息体RpcMessage
 * 实现ApplicationContextAware接口:该接口可以加载获取到所有的 spring bean。
 * 实现了这个接口的bean,当spring容器初始化的时候,会自动的将ApplicationContext注入进来
 *
 * @author ZC
 * @date 2021/3/1 22:15
 */
@Slf4j
@ChannelHandler.Sharable
public class ServerHandle extends SimpleChannelInboundHandler<RpcMessage> implements ApplicationContextAware {
    private Map<String, Object> serviceMap;

    /**
     * 在类被Spring容器加载时会自动执行setApplicationAware
     *
     * @param applicationContext Spring上下文
     * @throws BeansException 异常信息
     */
    @Override
    public void setApplicationContext(ApplicationContext applicationContext) throws BeansException {
        //从Spring容器中获取到所有拥有@RpcServer注解的Beans集合,Map<Name(对象类型,对象全路径名),实例对象>
        Map<String, Object> beansWithAnnotation = applicationContext.getBeansWithAnnotation(RpcServer.class);
        log.info("被@RpcServer注解加载的Bean: {}", beansWithAnnotation);
        if (beansWithAnnotation.size() > 0) {
            Map<String, Object> map = new ConcurrentHashMap<>(16);
            for (Object o : beansWithAnnotation.values()) {
                //获取该实例对象实现的接口Class
                Class<?> anInterface = o.getClass().getInterfaces()[0];
                //获取该接口类名,作为Key,实例对象作为Value
                map.put(anInterface.getName(), o);
            }
            //使用变量接住map
            serviceMap = map;
        }
    }

    @Override
    public void channelActive(ChannelHandlerContext ctx) throws Exception {
        log.info("客户端连接了: {}", ctx.channel().remoteAddress());
        super.channelActive(ctx);
    }

    @Override
    public void exceptionCaught(ChannelHandlerContext ctx, Throwable cause) throws Exception {
        log.error("异常信息");
        cause.printStackTrace();
        super.exceptionCaught(ctx, cause);
    }

    @Override
    protected void channelRead0(ChannelHandlerContext channelHandlerContext, RpcMessage rpcMessage) throws Exception {
        log.info("客户端发送的消息:{}", rpcMessage);
        //从Map中获取实例对象
        Object service = serviceMap.get(rpcMessage.getName());
        //获取调用方法
        Method method = service.getClass().getMethod(rpcMessage.getMethodName(), rpcMessage.getParTypes());
        method.setAccessible(true);
        //反射调用实例对象方法,获取返回值
        Object result = method.invoke(service, rpcMessage.getPars());
        rpcMessage.setResult(JSONUtil.toJsonStr(result));
        log.info("回给客户端的消息:{}", rpcMessage);
        //Netty服务端将数据写会Channel并发送给客户端,同时添加一个监听器,当所有数据包发送完成后,关闭通道
        channelHandlerContext.writeAndFlush(rpcMessage).addListener(ChannelFutureListener.CLOSE);
    }
}定义NettyServer端:
/**
 * Netty服务端
 *
 * @author zc
 * @date 2021/2/24 13:23
 **/
@Slf4j
public class NettyServer {

    /**
     * server端处理器
     */
    private final ServerHandle serverHandle;
    /**
     * 服务端通道
     */
    private Channel channel;

    /**
     * 构造器
     *
     * @param serverHandle server处理器
     */
    public NettyServer(ServerHandle serverHandle) {
        this.serverHandle = serverHandle;
    }

    /**
     * 启动
     *
     * @param port 启动端口
     */
    public void start(int port) {
        EventLoopGroup boss = new NioEventLoopGroup(1);
        EventLoopGroup worker = new NioEventLoopGroup();
        try {
            ServerBootstrap serverBootstrap = new ServerBootstrap();
            serverBootstrap.group(boss, worker)
                    .channel(NioServerSocketChannel.class)
                    .childHandler(new ChannelInitializer<SocketChannel>() {
                        @Override
                        protected void initChannel(SocketChannel socketChannel) throws Exception {
                            socketChannel.pipeline()
                                    .addLast(new ObjectDecoder(ClassResolvers.weakCachingConcurrentResolver(this.getClass().getClassLoader())))
                                    .addLast(new ObjectEncoder())
                                    .addLast(serverHandle);
                        }
                    });

            final ChannelFuture channelFuture = serverBootstrap.bind(port).syncUninterruptibly();
            log.info("服务端启动-端口: {}", port);
            channel = channelFuture.channel();
            channel.closeFuture().syncUninterruptibly();
        } catch (Exception e) {
            boss.shutdownGracefully();
            worker.shutdownGracefully();
        }
    }

    /**
     * 关闭当前通道
     */
    public void stop() {
        channel.close();
    }
}
自定义rpc配置属性类:
/**
 * @author zc
 * @date 2021/3/4 23:38
 */
@Component
@ConfigurationProperties(prefix = "netty")
@Data
public class NettyRpcProperties {
    private int serverPort;
}`
创建Server端启动配置类:
/**
 * NettyServer服务端配置类
 *
 * @author zc
 * @date 2021/3/1 18:24
 */
@Slf4j
@Configuration
@EnableConfigurationProperties(NettyRpcProperties.class)
public class ServerBeanConfig {

    private final NettyRpcProperties nettyRpcProperties;

    @Autowired
    public ServerBeanConfig(NettyRpcProperties nettyRpcProperties) {
        this.nettyRpcProperties = nettyRpcProperties;
    }

    /**
     * 配置ServerHandle
     *
     * @return ServerHandle处理类
     */
    @Bean
    public ServerHandle serverHandle() {
        return new ServerHandle();
    }

    /**
     * 配置NettyServer
     *
     * @param handle ServerHandle处理类
     * @return NettyServer
     */
    @Bean
    public NettyServer nettyServer(ServerHandle handle) {
        NettyServer nettyServer = new NettyServer(handle);
//        nettyServer.start(nettyRpcProperties.getServerPort());
        return nettyServer;
    }

    /**
     * 解决SpringBoot端口无法监听问题
     */
    @Component
    static class NettyServerStart implements ApplicationRunner {
        private final NettyServer nettyServer;
        private final NettyRpcProperties properties;

        @Autowired
        NettyServerStart(NettyServer nettyServer, NettyRpcProperties properties) {
            this.nettyServer = nettyServer;
            this.properties = properties;
        }

        @Override
        public void run(ApplicationArguments args) throws Exception {
            log.info("===============ApplicationRunner");
            if (nettyServer != null) {
                nettyServer.start(properties.getServerPort());
            }
        }
    }
}
注入Spring容器
此时有两种方式让该配置自动注入Spring容器生效:
-
自动注入
在resource目录下创建META-INF目录,创建spring.factories文件
在该文件里写上
org.springframework.boot.autoconfigure.EnableAutoConfiguration=${包路径:xxx.xxx.xxx}.${配置类:ServerBeanConfig}配置好之后,在SpringBoot启动时会自动加载该配置类。
-
通过注解注入
/**
 * 自定义SpringBoot启动注解
 * 注入ServerBeanConfig配置类
 *
 * @author ZC
 * @date 2021/3/1 23:48
 */
@Target({ElementType.TYPE})
@Retention(RetentionPolicy.RUNTIME)
@Documented
@Inherited
@ImportAutoConfiguration({ServerBeanConfig.class})
public @interface EnableNettyServer {
}
编写客户端
创建客户端处理器`ClientHandle
/**
 * @author zc
 * @date 2021/3/2 15:19
 */
@Slf4j
@ChannelHandler.Sharable
public class ClientHandle extends SimpleChannelInboundHandler<RpcMessage> {
    /**
     * 定义消息Map,将连接通道Channel作为key,消息返回值作为value
     */
    private final ConcurrentMap<Channel, RpcMessage> rpcMessageConcurrentMap;

    public ClientHandle(ConcurrentMap<Channel, RpcMessage> rpcMessageConcurrentMap) {
        this.rpcMessageConcurrentMap = rpcMessageConcurrentMap;
    }

    @Override
    protected void channelRead0(ChannelHandlerContext channelHandlerContext, RpcMessage rpcMessage) throws Exception {
        log.info("客户端收到服务端消息:{}", rpcMessage);
        rpcMessageConcurrentMap.put(channelHandlerContext.channel(), rpcMessage);
    }
}创建客户端启动类NettyClient
/**
 * @author ZC
 * @date 2021/3/1 23:30
 */
@Slf4j
public class NettyClient {

    private Channel channel;
    /**
     * 存放请求编号与响应对象的映射关系
     */
    private final ConcurrentMap<Channel, RpcMessage> rpcMessageConcurrentMap = new ConcurrentHashMap<>();

    public RpcMessage send(int port, final RpcMessage rpcMessage) {
        //客户端需要一个事件循环组
        EventLoopGroup group = new NioEventLoopGroup();
        try {
            Bootstrap bootstrap = new Bootstrap();
            bootstrap.group(group)
                    .channel(NioSocketChannel.class)
                    .handler(new ChannelInitializer<SocketChannel>() {
                        @Override
                        protected void initChannel(SocketChannel socketChannel) throws Exception {
                            socketChannel.pipeline()
                                    .addLast(new ObjectDecoder(ClassResolvers.weakCachingConcurrentResolver(this.getClass().getClassLoader())))
                                    .addLast(new ObjectEncoder())
                                    .addLast(new ClientHandle(rpcMessageConcurrentMap));
                        }
                    });
            final ChannelFuture channelFuture = bootstrap.connect("127.0.0.1", port).syncUninterruptibly();
            log.info("连接服务端成功: " + channelFuture.channel().remoteAddress());
            channel = channelFuture.channel();
            channel.writeAndFlush(rpcMessage);
            log.info("发送数据成功:{}", rpcMessage);
            channel.closeFuture().syncUninterruptibly();
            return rpcMessageConcurrentMap.get(channel);
        } catch (Exception e) {
            log.error("client exception", e);
            return null;
        } finally {
            group.shutdownGracefully();
            //移除请求编号和响应对象直接的映射关系
            rpcMessageConcurrentMap.remove(channel);
        }
    }

    public void stop() {
        channel.close();
    }
}
定义Netty客户端Bean后置处理器
/**
 * Netty客户端Bean后置处理器
 * 实现Spring后置处理器接口:BeanPostProcessor
 * 在Bean对象在实例化和依赖注入完毕后,在显示调用初始化方法的前后添加我们自己的逻辑。注意是Bean实例化完毕后及依赖注入完成后触发的
 *
 * @author ZC
 * @date 2021/3/2 23:00
 */
@Slf4j
public class NettyClientBeanPostProcessor implements BeanPostProcessor {

    private final NettyClient nettyClient;

    public NettyClientBeanPostProcessor(NettyClient nettyClient) {
        this.nettyClient = nettyClient;
    }

    /**
     * 实例化、依赖注入完毕,在调用显示的初始化之前完成一些定制的初始化任务
     * 注意:方法返回值不能为null
     * 如果返回null那么在后续初始化方法将报空指针异常或者通过getBean()方法获取不到Bean实例对象
     * 因为后置处理器从Spring IoC容器中取出bean实例对象没有再次放回IoC容器中
     */
    @Override
    public Object postProcessBeforeInitialization(Object bean, @Nullable String beanName) throws BeansException {
        //获取实例Class
        Class<?> beanClass = bean.getClass();
        do {
            //获取该类所有字段
            Field[] fields = beanClass.getDeclaredFields();
            for (Field field : fields) {
                //判断该字段是否拥有@RpcServer
                if (field.getAnnotation(RpcServer.class) != null) {
                    field.setAccessible(true);
                    try {
                        //通过JDK动态代理获取该类的代理对象
                        Object o = Proxy.newProxyInstance(field.getType().getClassLoader(), new Class[]{field.getType()}, new ClientInvocationHandle(nettyClient));
                        //将代理类注入该字段
                        field.set(bean, o);
                        log.info("创建代理类 ===>>> {}", beanName);
                    } catch (IllegalAccessException e) {
                        log.error(e.getMessage());
                    }
                }
            }
        } while ((beanClass = beanClass.getSuperclass()) != null);
        return bean;
    }

    /**
     * 实例化、依赖注入、初始化完毕时执行
     * 注意:方法返回值不能为null
     * 如果返回null那么在后续初始化方法将报空指针异常或者通过getBean()方法获取不到Bean实例对象
     * 因为后置处理器从Spring IoC容器中取出bean实例对象没有再次放回IoC容器中
     */
    @Override
    public Object postProcessAfterInitialization(Object bean, String beanName) throws BeansException {
        // 可以根据beanName不同执行不同的处理操作
        return bean;
    }

    /**
     * JDK动态代理处理器
     */
    static class ClientInvocationHandle implements InvocationHandler {
        private final NettyClient nettyClient;

        public ClientInvocationHandle(NettyClient nettyClient) {
            this.nettyClient = nettyClient;
        }

        /**
         * 代理方法调用
         *
         * @param proxy  代理类
         * @param method 方法
         * @param args   参数
         * @return 返回值
         */
        @Override
        public Object invoke(Object proxy, Method method, Object[] args) {
            //组装Netty参数
            RpcMessage rpcMessage = RpcMessage.builder()
                    .name(method.getDeclaringClass().getName())
                    .methodName(method.getName())
                    .parTypes(method.getParameterTypes())
                    .pars(args)
                    .build();
            //调用Netty,发送数据
            RpcMessage send = nettyClient.send(1111, rpcMessage);
            log.info("接收到服务端数据:{}, 返回结果值 ====》》》》{}", send, send.getResult());
            return send.getResult();
        }
    }
}
定义客户端配置类
/**
 * @author zc
 * @date 2021/3/1 18:24
 */
@Configuration
public class ClientBeanConfig {

    @Bean
    public NettyClient nettyClient() {
        return new NettyClient();
    }

    @Bean
    public NettyClientBeanPostProcessor nettyClientBeanPostProcessor(NettyClient nettyClient) {
        return new NettyClientBeanPostProcessor(nettyClient);
    }
}
最后和服务端一样,注入Spring容器
/**
 * @author ZC
 * @date 2021/3/1 23:48
 */
@Target({ElementType.TYPE})
@Retention(RetentionPolicy.RUNTIME)
@Documented
@Inherited
@ImportAutoConfiguration({ClientBeanConfig.class})
public @interface EnableNettyClient {
}
至此我们的SpringBoot + Netty4的就已经实现了最最简单的rpc框架模式了;然后我们就可以引用我们自己的rpc依赖了。
最后再执行一下maven命令
mvn installnetty-rpc-examples例子
接口服务
pom里啥也没有。。。
定义一个接口
/**
 * @author zc
 * @date 2021/3/1 17:55
 */
public interface Test1Api {

    void test();

    void test(int id, String name);

    String testStr(int id);

    Object testObj();
}
rpc-server服务端
正常的SpringBoot工程
引入pom
<!-- 自定义rpc依赖 -->
<dependency>
    <groupId>cn.happyloves.rpc</groupId>
    <artifactId>netty-rpc</artifactId>
    <version>0.0.1</version>
</dependency>
<!-- 接口依赖 -->
<dependency>
    <groupId>cn.happyloves.netty.rpc.examples.api</groupId>
    <artifactId>rpc-api</artifactId>
    <version>0.0.1-SNAPSHOT</version>
</dependency>
配置属性
# 应用名称
spring.application.name=rpc-server
# 应用服务 WEB 访问端口
server.port=8080
netty.server-port=1111
创建一个实体类
/**
 * @author ZC
 * @date 2021/3/2 23:59
 */
@Data
public class Account implements Serializable {
    private static final long serialVersionUID = 667178018106218163L;
    private Integer id;

    private String name;
    private String username;
    private String password;
}
创建Server实现Test1Api接口
/**
 * @author ZC
 * @date 2021/3/2 23:59
 */
@Slf4j
@Service
@RpcServer
public class TestServiceImpl implements Test1Api {
    @Override
    public void test() {
        log.info("111111111");
    }

    @Override
    public void test(int id, String name) {
        log.info("222222222,{},{}", id, name);
    }

    @Override
    public String testStr(int id) {
        log.info("33333333333333333,{}", id);
        return "33333333333333333 " + id;
    }

    @Override
    public Object testObj() {
        log.info("444444444444444444");
        Account account = new Account();
        account.setName("张三");
        return account;
    }
}
最后在SpringBoot启动类上加上@EnableNettyServer
/**
 * @author ZC
 * @date 2021/3/2 23:55
 */
@EnableNettyServer
@SpringBootApplication
public class RpcServerApplication {
    public static void main(String[] args) {
        SpringApplication.run(RpcServerApplication.class, args);
    }
}
rpc-server客户端
引入pom依赖
<dependency>
    <groupId>cn.happyloves.rpc</groupId>
    <artifactId>netty-rpc</artifactId>
    <version>0.0.1</version>
</dependency>
<dependency>
    <groupId>cn.happyloves.netty.rpc.examples.api</groupId>
    <artifactId>rpc-api</artifactId>
    <version>0.0.1-SNAPSHOT</version>
</dependency>
创建Controller
/**
 * @author ZC
 * @date 2021/3/3 0:04
 */
@RestController
public class ClientController {
    @RpcServer
    private Test1Api testServiceImpl;

    @GetMapping("/test1")
    public void test() {
        testServiceImpl.test();
    }

    @GetMapping("/test2")
    public void test(int id, String name) {
        testServiceImpl.test(id, name);
    }

    @GetMapping("/test3")
    public String testStr(int id) {
        return testServiceImpl.testStr(id);
    }

    @GetMapping("/test4")
    public Object testObj() {
        return testServiceImpl.testObj();
    }
}
最后在启动类上加上注解@EnableNettyClient
@EnableNettyClient
@SpringBootApplication
public class RpcClientApplication {
    public static void main(String[] args) {
        SpringApplication.run(RpcClientApplication.class, args);
    }
}
先运行服务端,在运行客户端,然后在调用客户端接口就可以看到服务端能够接收到客户端发来的消息,然后服务端处理并返回,客户端接收并返回。。。
至此,一个小demo就完成了。
当然啦,后续还有很多需求需要处理的,比方说当前demo中客户端每次通信都需要创建一个实例去连接、服务的注册、客户端和服务端是同一个应用等等,这个后面再慢慢完善吧。