webpack打包优化的3种方法转载
导语
webpack作为一款主流的打包工具,给用户预留了足够多的配置自由度,也存在很多优化空间,今天我们就一下几点讨论webpack打包优化。
正文
抽取公共代码
目标:把功能逻辑相同的代码进行单独打包,缩小各业务模块打包文件体积,实现打包文件并行加载,优化页面性能
适用场景:多页应用,抽离各页面模块公共代码(包括第三方依赖)
webpack提供了三种方式抽离公共代码:
方法一:optimization.splitChunks
假设我们的项目结构是这样的
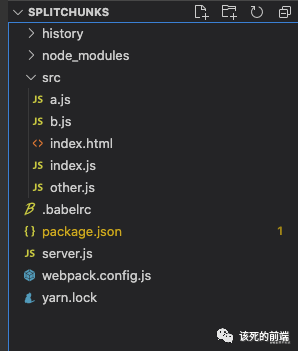
index 和 other 分别作为两个入口文件,且都引用了a,b两个模块。我们可以使用webpack的optimization配置抽离a,b到单独的模块,index 和 other 只需要引入抽离的公共模块即可,不需要再单独引入a,b。配置如下:
const path = require('path')
const HtmlWebpackPlugin = require('html-webpack-plugin')
const { CleanWebpackPlugin } = require('clean-webpack-plugin')
module.exports = {
  mode: 'development',
  entry: { index: './src/index.js', other: './src/other.js' },
  output: {
    filename: '[name][hash:8].js',
    path: path.resolve(__dirname, 'dist'),
  },
  optimization: {
    splitChunks: {
      cacheGroups: {
        common: {
          //开始抽离起点,initial表示入口处开始
          chunks: 'initial',
          //生成 chunk 的最小体积
          minSize: 0,
          //拆分前最小引用次数
          minChunks: 2,
          //公共模块名称
          name: 'common',
        }
      },
    },
  },
  module: {
    rules: [
      {
        test: /\.js$/,
        use: 'babel-loader',
      },
    ],
  },
  resolve: {
    extensions: ['.jsx', '.mjs', '.js', '.json'],
  },
  plugins: [
    new HtmlWebpackPlugin({
      template: './src/index.html',
      filename: 'index.html',
      chunks: ['index'],
    }),
    new CleanWebpackPlugin(),
  ],
}
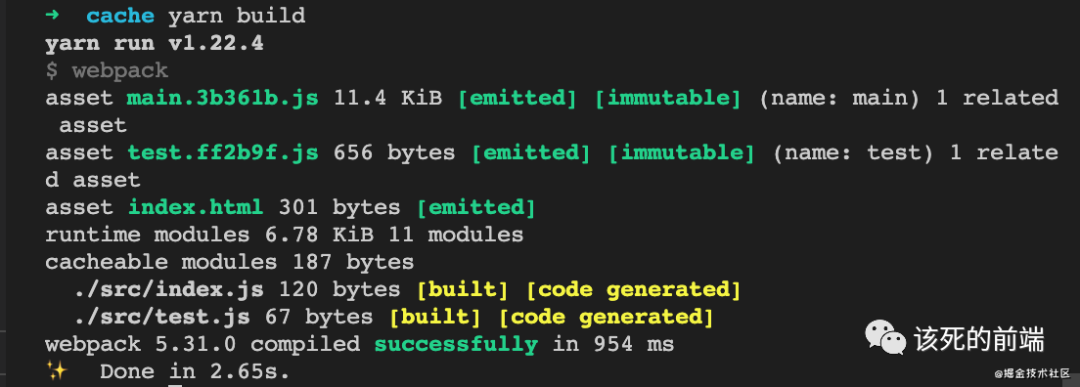
然后 yarn build 打包,查看打包文件,你会发现公共模块被抽取,生成了index.js,other.js以及common.js
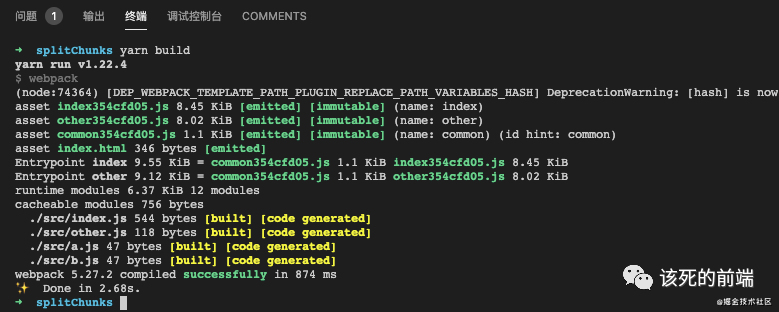
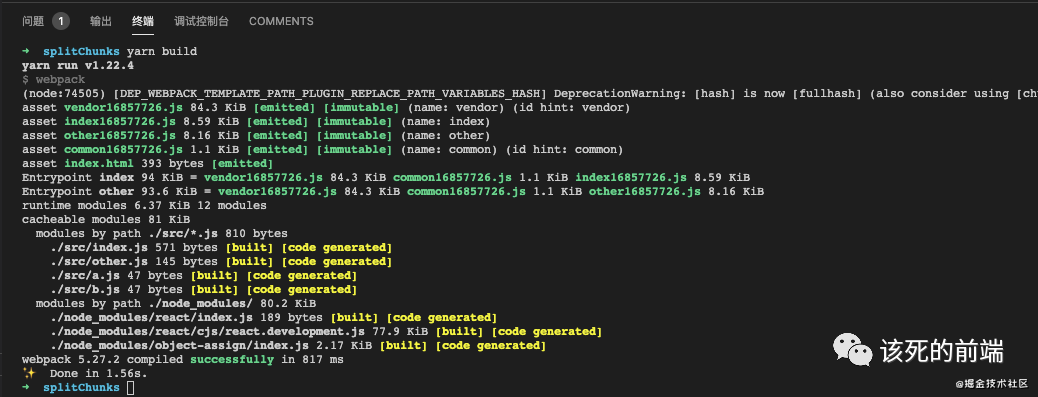
此刻,如果我们还引用了第三方模块,如jquery,moment,lodash等,也可以对第三方模块进行单独抽取。optimization配置如下:
 optimization: {
    splitChunks: {
      cacheGroups: {
        common: {
          chunks: 'initial',
          minSize: 0,
          minChunks: 2,
          name: 'common',
        },
        vendor: {
          chunks: 'initial',
          //抽取优先级,默认值是-20,意思是先抽取第三方模块,再抽取自己的公共代码,不然第三方模块也会被抽取到公共代码
          priority: 1,
          //正则匹配只抽取mode_modules中的模块
          test: /node_modules/,
          minSize: 0,
          name: 'vendor',
          minChunks: 2
        }
      },
    },
  }
然后我们打包,第三方模块也被成功抽取
方法二:entry手动配置
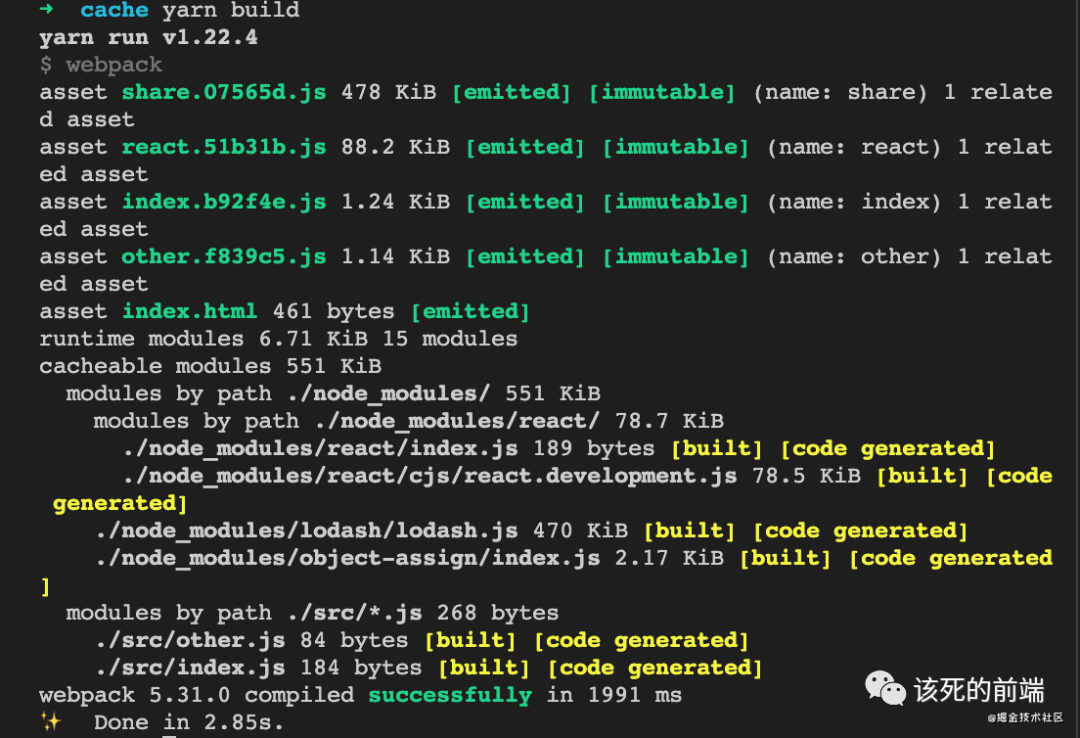
利用entry的多入口配置方式和dependOn属性,指定各入口的依赖项。如:
module.exports = {
  mode: 'production',
  entry: {
    index: { import: './src/index.js', dependOn: ['share', 'react'] },
    other: { import: './src/other.js', dependOn: ['share', 'react'] },
    share: 'lodash',
    react: 'react'
  },
  output: {
    filename: '[name].[contenthash:6].js',
    path: path.resolve(__dirname, 'dist'),
    chunkFilename: '[name].[contenthash:6].js'
  }
}
打包时webpack把react和lodash作为单独的入口进行打包,index和other中包含对react和lodash的引用
方法三:Dynamic Import
当我们在代码中动态引入其他模块,webpack打包时自动抽离动态引入的模块,例如:图片打包时会多一个文件(默认名字是[id].js)

如果我们想自定义动态模块的名字,需配置output.chunkFilename
Dll动态链接库
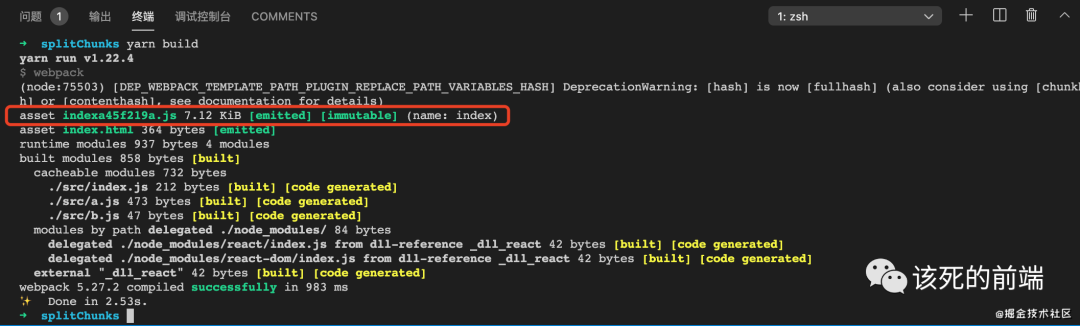
实际开发中,为了提升打包速度,我们可以把一些不常修改的依赖(如react,react-dom,vue,typescrity等)打包成dll动态链接库,下次build时不再打包这些依赖,达到加速打包的效果。下面以react为例,先看未使用dll的打包效果
我们可以看到入口文件包含了react的打包内容,比较大,而且每次build,都会再次对react进行打包
下面我们把react,react-dom打包成dll动态链接库:
创建dll打包配置
如webpack.config.dll.js
const path = require('path')
const webpack = require('webpack')
module.exports = {
  mode: 'development',
  entry: {
    react: ['react', 'react-dom'],
  },
  output: {
    filename: '_dll_[name].js',
    path: path.resolve(__dirname, 'dist'),
    //导出模块名称
    library: '_dll_[name]',
    libraryTarget: 'umd',
  },
  plugins: [
    new webpack.DllPlugin({
      //输出文件名称
      name: '_dll_[name]',
      //指定manifest文件绝对路径
      path: path.resolve(__dirname, 'dist/manifest')
    })
  ]
}
打包dll
npx webpack --config webpack.config.dll.js
也可以在scripts中配置
{
  "scripts": {
    "build:dll": "webpack --config webpack.config.dll.js"
  }
}
//yarn build:dll
在dist目录下会打包生成_dll_react.js和manifest文件。manifest文件记录了react依赖的映射

在html模版文件中引入打包后的dll文件
<!DOCTYPE html>
<html lang="en">
<head>
  <meta charset="UTF-8">
  <meta http-equiv="X-UA-Compatible" content="IE=edge">
  <meta name="viewport" content="width=device-width, initial-scale=1.0">
  <title>Document</title>
  //写死文件路径
  <script src="/_dll_react.js"></script>
</head>
<body>
  <div id="root"></div>

</body>
</html>
打包我们自己的项目代码
在打包项目代码之前,需要在webpack主配置中添加react依赖映射,如:
const path = require('path')
const HtmlWebpackPlugin = require('html-webpack-plugin')
const { CleanWebpackPlugin } = require('clean-webpack-plugin')
const webpack = require('webpack')
module.exports = {
  mode: 'development',
  devServer: {
    port: 3000,
    hot: true,
    open: true,
    contentBase: path.resolve(__dirname, 'dist'),
    compress: true,
    proxy: {
      '/api': {
        target: 'http://localhost:8888',
        pathRewrite: { '^/api': '' },
      },
    },
  },
  entry: { index: './src/index.js'},
  output: {
    filename: '[name][hash:8].js',
    path: path.resolve(__dirname, 'dist'),
  },
  module: {
    rules: [
      {
        test: /\.js$/,
        use: 'babel-loader',
      },
    ],
  },
  resolve: {
    extensions: ['.jsx', '.mjs', '.js', '.json'],
  },
  plugins: [
    new HtmlWebpackPlugin({
      template: './src/index.html',
      filename: 'index.html',
      chunks: ['index'],
    }),
    // new CleanWebpackPlugin(),
    new webpack.DllReferencePlugin({
      //映射文件路径
      manifest: path.resolve(__dirname, 'dist/manifest')
    })
  ],
}
配置完成后,当我们打包项目时,webpack会首先根据配置的manifest映射文件查找react依赖,如果找到了,便不再对react进行打包;如果找不到,会打包react。我们可以查看一下打包后的文件大小
可以看到,使用dll打包后,项目入口文件小了很多(因为不再包含react打包内容)
多线程打包
由于webpack打包是单进程,当项目文件和依赖很多时,webpack打包速度会很慢。为此,我们可以引入happypack多线程(Thread)打包。happypack会把webpack的打包进程拆分成多个线程,各线程完成文件解析和打包任务,把结果返回给主进程。
安装happypack
yarn add happypack -D
配置happypack
const path = require('path')
const HtmlWebpackPlugin = require('html-webpack-plugin')
const { CleanWebpackPlugin } = require('clean-webpack-plugin')
const Happypack = require('happypack')
const webpack = require('webpack')
module.exports = {
  mode: 'development',
  devServer: {
    port: 3000,
    hot: true,
    open: true,
    contentBase: path.resolve(__dirname, 'dist'),
    compress: true,
    proxy: {
      '/api': {
        target: 'http://localhost:8888',
        pathRewrite: { '^/api': '' },
      },
    },
  },
  entry: { index: './src/index.js' },
  output: {
    filename: '[name][hash:8].js',
    path: path.resolve(__dirname, 'dist'),
  },
  module: {
    rules: [
      {
        test: /\.js$/,
        use: 'Happypack/loader?id=js',
      },
      {
        test: /\.less$/,
        use: 'Happypack/loader?id=style',
      },
    ],
  },
  resolve: {
    extensions: ['.jsx', '.mjs', '.js', '.json'],
  },
  plugins: [
    new HtmlWebpackPlugin({
      template: './src/index.html',
      filename: 'index.html',
      chunks: ['index'],
    }),
    // new CleanWebpackPlugin(),
    new webpack.DllReferencePlugin({
      manifest: path.resolve(__dirname, 'dist/manifest'),
    }),
    new Happypack({
      id: 'js',
      use: ['babel-loader'],
    }),
    new Happypack({
      id: 'style',
      use: ['style-loader', 'css-loader', 'less-loader'],
    }),
  ],
}
happypack参数说明:
- id:happy plugin的唯一标识,module.rules中使用plugin时需传入id;
- loaders:loader数组,也可以跟module.rules写法一样用use;
- threads:happy plugin模块开启的线程数,默认是3个
- 其他优化项
tree-shaking
webpack打包时,检测未引用代码(dead code),并安全地删除,不打包到bundle的优化机制
发挥webpack的tree shaking优势,必须满足以下条件:
1、使用 ES2015 模块语法(即 import 和 export),因为ES Module是静态分析,代码解析的时候就知道有哪些import和export,而commonJs是动态加载,只有在执行的时候才能加载引入的模块。所以tree shaking机制对commonJs模块无效;
2、必须是生产环境(production);
3、如果不确定未引用代码是否产生副作用,需使用sideEffects指定,默认值是false,即所有未引用的代码都不会产生副作用
ps:sideEffects可以在package.json中指定,也可以在webpack的module配置中指定
scope hosting
webpack中自动省略可以简化的代码,如
const a = 1
const b = 2
const c = 3
console.log(a+b+c)

//打包后
console.log(6)
noParse
防止 webpack 解析那些任何与给定正则表达式相匹配的文件。忽略的文件中 不应该含有 import, require, define 的调用,或任何其他导入机制。忽略大型的 library 可以提高构建性能
简单来说就是明确告诉webpack,哪些依赖不需要解析,从而提升构建速度。如:
module.exports = {
  //...
  module: {
    noParse: /jquery|lodash/,
  },
}
IgnorePlugin
忽略正则表达式或过滤器函数匹配的模块
在我们引用一些第三方模块的时候,其实很多功能我们并不关心,也没有用到,在webpack打包的时候,也会把这些没用的功能打包,从而使构建速度变慢。
这时候,我们就可以使用webpack.IgnorePlugin明确告诉webpack,哪些依赖不需要打包。如moment的locale语言包,我们只用到了中英文,而不想引入其他没用到的语言。我们可以这样配置:
module.exports = {
  //...
  plugins: [
    new webpack.IgnorePlugin({
      resourceRegExp: /^\.\/locale$/,
      contextRegExp: /moment$/,
    })
  ]
}
然后我们只需要在使用moment多语言的地方手动设置即可
import moment from 'moment'
import 'moment/locale/zh-cn'
moment.locale('zh-cn')
console.log(moment().endOf('day').fromNow())
以上就是近期整理的webpack打包优化,不尽之处,欢迎指摘!!!
更多思考
本篇主要介绍了webpack打包优化的3种方法,更多关于webpack的优化内容大家可以阅读以下内容学习
用Webpack这15个点,速度提升70%,体积减小80%!